Showing posts with label DIY. Show all posts
As a fellow bookworm, I know the struggle of losing track of a page. A few days ago,as I was reading "To Kill A Mockingbird" a few ideas of bookmarks popped into my mind.
And we shall start with the easy DIY-s!
1. Stickers!
 To make the bookmark, just fold the paper in two and scribble cute words on it. Then, to make sure it sticks out, just put a sticker right on the top edge of it.
Not only it looks super cute, but it is done within a few minutes and it comes in very handy and it's really practical!
2.Maps!
As  ridiculous as this sounds, a map makes a great bookmark. Before you come at me for ruining a map - I have 100 maps of the world so I don't necessarily need them. Why not turn them into something useful?

As you can see, I chose South America to be my bookmark.
Once again, just cut a piece of paper in a map, fold in two then cut the edges so they're straight and parallel with each other.
3.Magazine or book article!
It didn't take me a lot of time to find this cute part in a magazine, and as soon as I saw it I imagined using it as a bookmark. So I cut it in a "banner" type of form.

There are a lot of cute articles for you to choose from - the options are endless!
And it also sticks out really well - so you can just gently open it.
4.Easy tape!
For those of you who prefer something really easy and quick to make, while maintaining a modest and cute look at the same time - this DIY might be just for you!
At first, you need to cut a small piece of paper and washi tape.
Take a side of the washi, and tape it to a side of the piece of paper. Then tape the other edge of the tape on the opposite side of the paper, and just secure the washi tape is sticked into each other.
It's very easy and I don't think this even needed a "tutorial" but, oh well!
5.Drawing!
Or doodling? Since I love melons, I figured I would draw a kawaii one!
To begin with you're going to need a piece of paper folded in two. Then you're going to cut it however you want - shaped like a fruit, coffee, animal, food .. your call! You just have to make sure you're going to leave the edge uncut so the bookmark stays in two parts.
Although I left a SMAAALL part held together, it doesn't matter because it looks cute,so!
6.Sticky notes!
Sticking two sticky notes instantly makes a fast bookmark (or just one sticky note at that!).
But I must warn you, it can get pretty annoying when they're not glued well to each other.
You can't say this isn't cute, right?
And that concludes the list of these 6 easy-to-make cute bookmarks!
You can find other pretty ones on pinterest - some even are origami ! However,they take more time, so.
This was it for today's post. I hope you enjoyed it.
(Did anyone notice a change on the theme?)
All the love,
A My Pastel World Citizen
Follow


As we dig deeper into our closet,we find clothes that we haven't worn in a long time,so we take them and put them in the bin.But honestly,why would you throw away a piece that could turn into a trendy unique new self ?The process is not only fun,but does no harm if you accidentally screw up - since you were going to throw them out anyways.
These thoughts all came to me as I saw a pair of jeans that I bought back in 5th grade (5 years ago) that still fit me but somehow are out of trend.
And THEN I figured out a few ways to revamp them and decided to share them with you!
We can start off by the back pockets! There is so much you can do - starting from gluing jewelry,glitter,painting etc. I decided to paint Van Gogh's famous painting "Starry Night".This idea was inspired from an image I found on weheartit.
I started by sketching the painting using a reference,of course.This is highly recommended because it makes the work easier and more accurate.
Then I started painting.
And this is the finished result! As you can see,I also painted the other pocket with a light blue shade,just so it wouldn't look so blank.Acrylics are really nice,however,I wouldn't recommend doing this to the pair that you plan on wearing everyday,because once it rains,you're doomed.(unless you use fabric paint,of course).
Moving on to the next idea:
Using just scissors,tweezers and (not necessarily) a marker,you can join the "see my fishnets through the rips" trend.The steps are pretty much self-explanatory but I'm going to break it down for those who haven't tried ripping their own jeans (yet).So you wear the jeans and then mark  the part that you want to rip.It's really important to do that while wearing the pants,because it's more accurate.Anyways after that,grab the scissors.
And this step is done! I would recommend saving the excess fabric for one of the next ideas ;)
Now,with the tweezers,start plucking the corners and pull out.This is really fun especially when you're angry haha.You may skip this step,you know,but this gives the rip a more "natural" cut,as if you bought it ripped.
And that's about it.If you feel like it,go crazy with the rips,ain't no one stoping you!
To give the pants a fresher and more original look,I rolled the bottoms and wrote stuff with black acrylic paint (what a suprise).
Then I grabbed a black pen and drew on the pants,using a reference of an outline (here).I didn't let the creativity run wild with this one,but you can do all sorts of patterns and mandalas and much more beautiful ideas!You don't have to be good at art to do a mandala,since it's only made of triangles and circles.Just make sure to use a reference though!
Now,grab the excess fabric I mentioned earlier.
Using that piece of fabric,I made a sort of a "patch" with a tumblr quote and rose written on it.
Then I cut it out and glued to the pants.You could do so much with this idea,there is tons of patch insipration online.You can use other fabric,color and even paint the patch,and sew it to your pants.Why not sew something directly to your pants if you're good at it?


To add more spice to the look,I wore fishnets under the jeans,and to anyone curious as to how they turned out,here is a picture:
The patch is on the knee under the rip but you can't really see it since it's jean colored.But yeah.
I'm really happy on how these turned out,even if I can't really wear them outside often.They're useful for pictures and I'll certainly wear them more than I used to.
If you have any old clothing,I'd recommend trying to add spice to it,whether it's a shirt,pants,shoes etc.
Oh and here's a comparison.
You can clearly see which version is the glo-up here lol.
Anyways,expect a ' march monthly journal layout ' REALLY really soon!
I hope you enjoyed today's blogpost.
XOXO,
A My Pastel World Citizen
Hi guys! Today I figured I'd do something back-to-school related.I'm gonna show you two ways to make a galaxy print using only watecolor (not acrylic paint!).You can use these methods to a notebook,canvas - whatever you'd like.Make sure to send me photos if you do try these methods.Personally,I think the second way worked faster&better but the choice is yours.Without a further do,let's get into it! >>
1.For the first method,you're going to need:
-watercolor (sorry for that mess doe) -a sponge/sponge brush -water -a surface [the choice is yours!!]
 -brush
Get the brush and dip it in water.This is the only time we'll need the brush ;p
Then paste it,into the color you're going to use to make it wet.Do so for all the colors you're going to need and make sure you make them wet all the time (not just at the beginning)
Take the sponge and dip it into the first color.Give it as much pressure as possible [the more color it gets,the better it is]
Then,paste it into the surface in a up-down-up-down motion.Spread the color as much as possible until you're pleased. :)
Then,continue with the other colors,making sure to create a gradient between the two colors.I left it like this and wrote a quote on it [I can't help it—it turned out so pretty u.u] , but if you want a galaxy effect,continue doing this with galaxy colors until the surface is completely covered in your colors.Then let it dry and paint some stars.But an easier way I'd recommend,is dipping the brush in the white color,then move your finger at the tip of the brush.It'll be an easier and much realistic way (although it might turn a bit messy,oops!)
2. Now into the second method (you won't need a sponge on it tho).Dip the brush into the water and then gently create a layer on the surface,as shown in the photo.Make sure to cover the whole surface with water,cause we need it to be wet,otherwise the effect won't show up x

Then start adding a few drops of galaxy colors,and watch them as they mix together and create the beautiful effect.Continue doing so until the whole surface is covered in colors.
This is how mine turned out before adding the stars.Continue scrolling to see the final result v
My 'stars' didn't turn out well,only bc I didn't have the white color and used light pink instead.But trust me,if you do have a white color,this will turn out super pretty.Even though it didn't turn out perfect,I love it! :D
-Hope you enjoyed and learned something lovelies,make sure to send feedback on my social media or comment down below.
See you soon,with an exciting post^__^
All the love.
Hi loves! It's been a long time since I last posted and I deeply apologize.But now I'm back,and as you can see,ready to attack :) Today I'm gonna show you a easy way to have your personalized labels in a trend everyone seems to love in the blog world: watercolor! :D Hope you enjoy,and make sure to send me pics in intstagram @mypastelworld1 or twitter @mypastel_world . Now without being sad,let's get into it x
-First things first,the base.Take a paper and watercolors and let your creativity do the job! Create different shapes with different colors,making sure the colors are too bright.Also make sure you dip the brush into water for a long time so it's too wet.That's how this effect works.Then let it dry for as long as you want,but I prefer overnight. :)
-The fun part : doodling! After letitng them dry,grab a [preferably black] pen and draw on the shapes,also letting the creativity blow ! :D Don't forget to also use a ruler (a really cute ruler,in my case:3) for some of the shapes you think need it.*-*
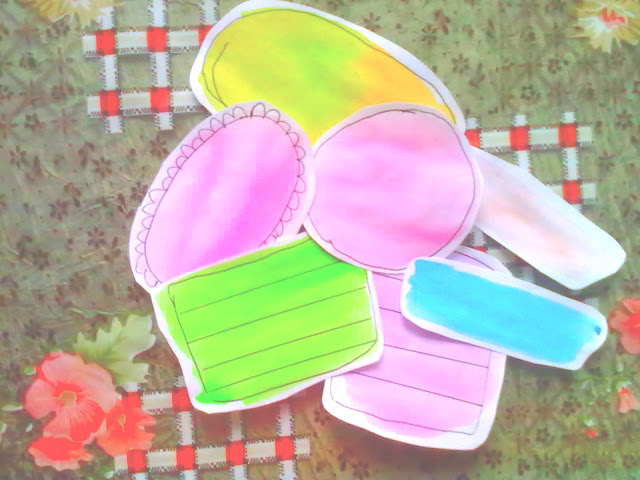
-Incase you wondered,here's how mine turned out.I made them messy on purpose tho:p I also let some of them the way they were bc I was afraid I'd ruin them. I really like how these turned out.
-Now cut them out.Cut them as you wish.I decided to leave a bit of the paper around the edges just so it looks kinda messier and more fun (but it's totally up to you!).This green color is so bright it even reflected on my scissors ha>_<
-There you go! Now you have some free watercolor labels :) I'm saying "free" bc you probably have all the items you need lying around your house ;).It doesn't consume a lot of time and it's really customizable ! For example , if you didn't notice,I made a ombre label :p It's oval shaped.If you want,scroll up and you'll see it.
Here's how I used the pink cute label,to make a cookbook ha! x And you see dat hint hint? It's bc in one of my next posts Imma show you how to make this cute galaxy patterned notebook :D Make sure you follow me on Bloglovin,Google or any social media so you don't miss [>u<]
With all the love.